DIY Tiramisu Cube from Neko Atsume
We love to peruse the “fixtures” at store closing sales. It’s fun to look at all the tables, displays, and mannequins - pieces that are normally hidden under mountains of clothes and merchandise - and try to figure out how they were once used. It makes you look at the store in a new light.
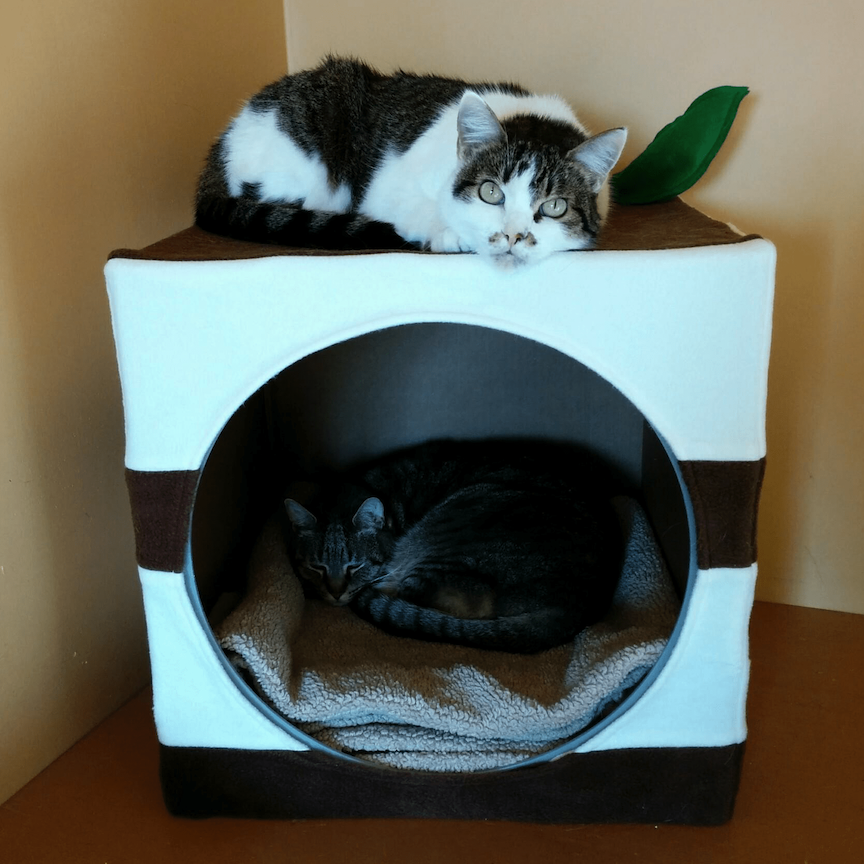
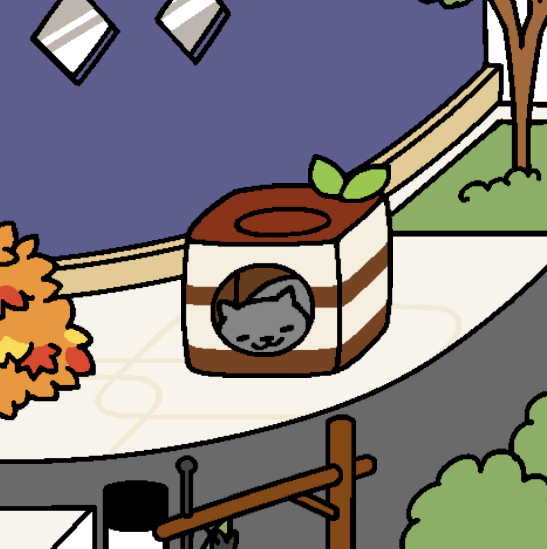
A few months back, we visited a Sears in its final weeks. One of the most interesting items we saw was a stack of plastic cubes with circles cut out of 4 of the 6 sides. While we couldn’t figure out how these cubes were originally used, we saw the potential in what they could become, and bought one to make the Tiramisu Cube cat bed from Neko Atsume. Here's the finished product along with a screenshot of the original for comparison. (The digital version also holds two cats but I couldn't get them to cooperate for me today, so you'll have to imagine a second cat sitting on top.)
Here's how I turned the Sears fixture into this super cute cat bed. I'm super happy with how it turned out!
Here are the cubes in their natural element, stacked up in the fixture section at Sears. We only purchased one of these... I feel a little regret that we didn't get more!

The cube, cleaned and ready to go. I can't imagine how this was once used... was something stored inside it?

The first step was to make the cover. I chose fleece since it’s soft and has some thickness to it. Taking some measurements of the cube, I made 1 square for the top in solid brown, and 4 squares for the sides with the tiramisu stripes. On one of the sides, I cut out a circle for the doorway and hemmed it.

The first fitting, once the cover was complete. I didn’t take into account was how stretchy the fleece would be... since the cover was super snug, the circle opening stretched and you could see the grey of the plastic in the front.
If I made this again, I’d be more conservative when cutting the opening so the sliver of plastic wouldn't show. However, at this point, making a new panel, ripping seams, and re-sewing would have taken me forever and a day, so I decided it didn't bother me too much.

Next: the leaves! I used felt for these to give them some more structure. I also made them a wire armature so they would stay upright.
The ended up being two different colors since it turns out I didn’t have enough of the same color to make two leaves…. haha. I think that was a lucky miscalculation since they actually look quite good in two tones!

Once all the pieces were complete, I set about prepping the interior.
I bought enough fleece to line the inside. My first thought was to make removable fleece panels but I was worried that plastic + fleece + furry cats = major static, so ended up lining the inside with cardboard. Cats love cardboard boxes, right?
I also added some duct-tape to the upper corner. The tape would secure the ends of the leaf armature so the leaves would stay upright.
The finished product! Final steps included securing the cover, cutting a hole in the top right and inserting the leaves, and making a brown pillow for the inside. The pillow ended up being a little too puffy (any cat that tried to sit on top would probably roll right off) so it was replaced with a more comfy blanket.

The tiramisu cat bed currently lives at my boyfriend's parents' house since we don't have any cats of our own. :)
Have you seen any other Neko Atsume inspired cat furniture? I'd love to see it! I've found versions of the cardboard truck, cat condo, cafe, house, and cat pancake, but no cubes to date.